 Print Template Triggers
shippilling.
| Document Version | v.5 |
|---|---|
| Document Last Updated | 1/16/2026 |
| Software Version Documented | v.10 |
Task/Problem Overview
This KB article will review the events that cause each automatically created document to be generated.
All documents can be reprinted from the Documents>Dispatch Viewer.
See Reprinting Documents and Resending Emails from Dispatch Viewer - KB
Note: All documents shown here can be modified, before, during and after your implementation.
The list of documents can be found in the Admin>Administrator>Print Templates

-
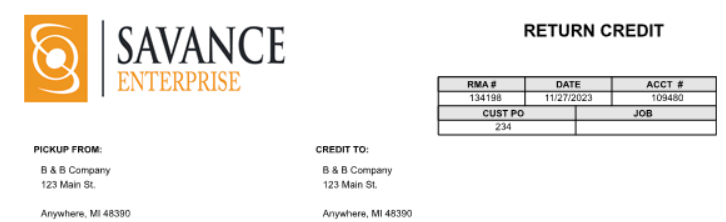
Customer Return Request / RMA (Return Material Authorization)
-
Order Refund Receipt (new in V10)
-
Pre Receiver (new in V10)
-
Inventory Location Label
What events trigger each template to print?
Savance Enterprise has numerous print templates. This knowledge base article lists each one, along with all the different events that trigger it to print.
AR Receipt
- In the Accounting Manager, under Accounts Receivable, when Receiving Money, if you have the Print, Email, or Fax checkmark checked, after posting,, you will be given the option to print an AR Receipt.


Check
-
Issue a check in the Write Checks section of the Accounting Manager.
-
Pay a bill in the Pay Bills section of the Accounting Manager
-
If the Queue to Print option is checked, then go to Accounting>Accounting Manager>Send Documents to complete the process.
-
Checks can be designed according to your check stocks

Credit Memo


-
This is an account-level setting. In the Delivery Methods tab of the Account Manager, enable the Credit Memo by placing a checkmark in the Customer Credit print checkbox.

-
In the Accounting Manager Accounts Receivable Section, if you receive money from that customer and they are left with a credit, then the Credit Memo will print.
-
In Accounts Receivable, if you use the Customer Payment/Refund option to issue a Customer Credit, a Credit Memo prints.

- Once you have received the items on a RMA receiver and have marked the Credit Status as Credited on the Customer Credit tab, the Issue Refund option becomes available. Hit the Issue Refund button and refund the money in the form of a Customer Credit. A Credit Memo prints once you save.


Quote/Order, RFQ/PO, Customer Return/RMA, Vendor Return/RTV,when you have that Record open, in the Left Bar, click the Print button**.** Or select the Print or Print Preview option from the Order menu.


|
Vendor Return Request /
|
|---|---|
 |
|
 |
 |
| Quote / Order | RFQ (Request for Quote) / PO (Purchase Order) |
|---|---|
 |
 |
 |
 |
Receipt
- Upon Conversion of a Quote to an Order in Point of Sale mode, a Receipt will print.

-
Accept a payment for a cash account in Point Of Sale mode.
-
Accept a payment for a credit account in Point Of Sale mode with the CASH option checked.

- Enter a payment on the Invoicing tab in the shipper for a Point of Sale order


- In the Accounting Manager, under Accounts Receivable, choose the Customer Payment/Refund option. The Payment/Refund Money screen will come up. Choose Customer Payment for the Transaction Type and fill out the rest of the information. After hitting the Accept Payment button, you will be given the option to print a Payment Receipt.


Refund Receipt
- Under Accounting>Standalone Payment/Credit

- In the Accounting Manager, under Accounts Receivable, choose the Customer Payment/Refund option. The Refund/Credit Customer screen will come up as above. Choose Refund for the Transaction Type and fill out the rest of the information. After hitting the Issue Refund button, you will be given the option to print a Refund Receipt.


Order Refund Receipt
Upon Refunding a Deposit, with no shipped lines, but a deposit has been paid, Summary, click the back arrow/refund deposit button, to process a refund.
-
The printing options screen appears and click ok when ready

-
The Order Refund Receipt prints showing the order data and that the amount refunded was refunded

RMA Receipt
- Once you post a Return Merchandise Authorization (RMA) to ‘received’ in the receiver, you can place a checkmark in the Credited box under the Customer Credit tab. This prints once you save.


Pick Ticket
- Prints when you Convert a Quote to an Order and the item is in stock.


- Prints when you Unlock an Order, add an item that is available, and hit Save.


- Prints when you Inventory>Shipping>Process BackOrders, making an item allocated for an order.

- Print when you use Release Management and have Print PT for newly created shipper checked. This is a “sticky” checkmark.


- NOTE: There are ways to Prevent Printing of Pick Tickets

Materials Pull Sheet
This is a document much like a Pick Ticket that can be helpful when processing POS orders. In Settings, General Settings, the Point of Sale tab: The first setting “Don’t Print PT if Materials Pull Sheet Printed” will make sure you don’t also get a PT if you already printed the Pull Sheet. If a Pull Sheet is never printed, a PT will print like normal. For Cash POS orders, with those 2 checkboxes checked, add the items for the order. Some may be available now, some not. Upon clicking Convert, the Materials Pull Sheet will print showing the available items and their locations showing where to find them 

- Then a screen called Counter Release Management will appear. This will show all items available to pick now (partially or fully) and hide the items that have zero or negative availability.
Shipper (Items) or Packaging Lists
- Prints when you hit the Print Packaging Lists button and choose the Print Per Release options. This is found on the Packing tab of the shipper.

- Prints when you Post to Packed and you have the “Automatically Print Packaging List after Packaging” option set in Administration -> Warehouses -> Shipping Settings.


Shipper (Driver Copy)
- Prints when you Post to Packed and you have the “Automatically Print Shipper Driver Copy after Packaging” option set in Administration -> Warehouses -> Shipping Settings.


Shipper Label (Items)
- Hit the Print Packaging Labels button on the Packing tab of a shipper and choose the Print Per Item option.
Shipper (Packages)
- Hit the Print Packaging Labels button on the Packing tab of a shipper and choose the Print Per Item option.
Shipper Label (Packages)
- Hit the Print Packaging Labels button on the Packing tab of a shipper and choose the Print Per Item option.

NOTE: Packaging Labels can be designed per your specifications.
Put Away Report
- There is a setting under Administration -> Warehouses -> Receiving Settings called “Automatically print Put Away Report after receiving” to automatically print after Post to Received in the Receiver.


Pre Receiver
Before Posting to Received or PutAway, you can Print Receiver


Inventory Label
- In the Label Printing Manager, choose Inventory Label. The Label Printing Manager is found in the Order menu, as well as the Packing tab of a Shipper


NOTE: Labels can be designed per your specifications.
Install Location Label

NOTE: Labels can be designed per your specifications.
-
In the Label Printing Manager, choose Install Location Label. Install locations must be specified for the items. The Label Printing Manager is found in the Order menu,
-
as well as the Packaging tab of a shipper.

Manifest
- In the Warehouse Manager’s Shipping section, Manifests tab. Select a manifest. The Manifest Actions button has a Print Manifests option.


Invoice


-
In the shipper of an order, once you post it to be Loaded or Delivered, place a checkmark in the Queue to Send Invoice or Prompt to Print Invoice.
-
There is a setting under Administration -> Warehouses -> Shipping Settings called “Automatically Generate Invoice after” to automatically print after posting to the specified stage.
-
There are two settings under Administration -> Warehouses -> Shipping Settings called “Automatically Generate Invoice after” and “Auto Post Shippers To Delivered”. When both are checked, an invoice will print after converting a non-cash sale.
-
If you Queue to Send Invoice for printing or emailing later, then go to the Accounting>Accounting Manager>Send Documents to complete the process.


Deposit Slip
-
Go to Accounting>Accounting Manager>Record Deposits. Select some checks for a bank deposit and hit Save. You will then be given the option to print a deposit slip.
-
Deposit Slip can be Opened from the Deposit History screen as well and reprinted.


Remittance Advice
- This is a vendor-level setting. In the Delivery Methods tab of the Vendor Manager, enable the Remittance Advice by placing a checkmark in the Remittance Advice print checkbox. In the Accounting Manager Accounts Payable Section, if you pay an invoice from that vendor, then the Remittance Advice will print. It can be reprinted from Documents>Dispatch Viewer.


RTV PT
- In converting a Vendor Return Request to a Return To Vendor (RTV),an RTV Pick Ticket will print.

RTV Shipper (Driver Copy)
- In the shipper of a Return To Vendor (RTV), post to the Packed stage to print.


Statement
-
In the Accounting Manager, there is a Statements option under Accounts Receivable. After searching for and choosing which accounts, follow the wizard to print the Statement.
-
If you queue the Statement for printing later, then go to Accounting>Accounting Manager>Send Documents to complete the process.

